The Tevo Tarantula, a popular and affordable 3D printer, is a great starting point for many hobbyists. However, like any entry-level machine, there’s always room for improvement. One of the most impactful upgrades you can perform is replacing the stock stepper motors with higher-quality Nema 17 motors. This guide will walk you through the process, providing detailed instructions and insights to elevate your 3D printing experience. Upgrading to Nema 17 motors can significantly enhance your printer’s performance, making it a worthwhile investment for any Tevo Tarantula owner looking to boost print quality, speed, and overall reliability.
Why Upgrade Your Tevo Tarantula with Nema 17 Motors
The stock motors on the Tevo Tarantula, while functional, are often the first components to limit the printer’s potential. Upgrading to Nema 17 motors unlocks a range of benefits that can dramatically improve your 3D printing results. These motors are designed to provide greater precision and power, leading to smoother prints, faster printing speeds, and a more reliable printing experience. By making this upgrade, you’re not just improving a single aspect of your printer, but you’re enhancing the overall capabilities and longevity of your Tevo Tarantula, setting the stage for more complex and higher-quality projects.
Benefits of Upgrading Nema 17 Motors
Improved Print Quality

Nema 17 motors offer enhanced precision, reducing issues such as layer shifting and ringing. This is because they provide greater torque and better control over the movement of the print head and the build platform. The improved precision translates directly to higher-quality prints, with sharper details and smoother surfaces. This upgrade is especially noticeable in prints with intricate designs or small features, where the increased accuracy of the Nema 17 motors truly shines. The images of your final prints will reflect the improved quality, making it a satisfying investment for the precision-focused user.
Increased Speed and Efficiency
With greater torque, Nema 17 motors can handle faster print speeds without sacrificing accuracy. This means you can complete projects in less time. Along with the benefits of speed, the upgraded motors often perform with greater efficiency, reducing the likelihood of missed steps and printing errors that can waste time and material. By allowing the printer to move more quickly and reliably, the upgrade can lead to a significant increase in productivity. This makes your 3D printing more efficient, allowing for more projects to be completed within a given timeframe, improving overall workflow.
Durability and Reliability
Higher-quality Nema 17 motors are typically more durable than the stock motors that come with the Tevo Tarantula. They are built to withstand the demands of extended printing sessions and the stresses of continuous use. This increased durability translates to fewer failures and less downtime, contributing to a more reliable printing experience. By choosing robust Nema 17 motors, you’re investing in the longevity of your 3D printer. This reduces the need for frequent replacements and maintenance, ensuring that your machine will keep working efficiently over time. The long-term reliability contributes to an increased lifespan for your machine, and the user’s peace of mind.
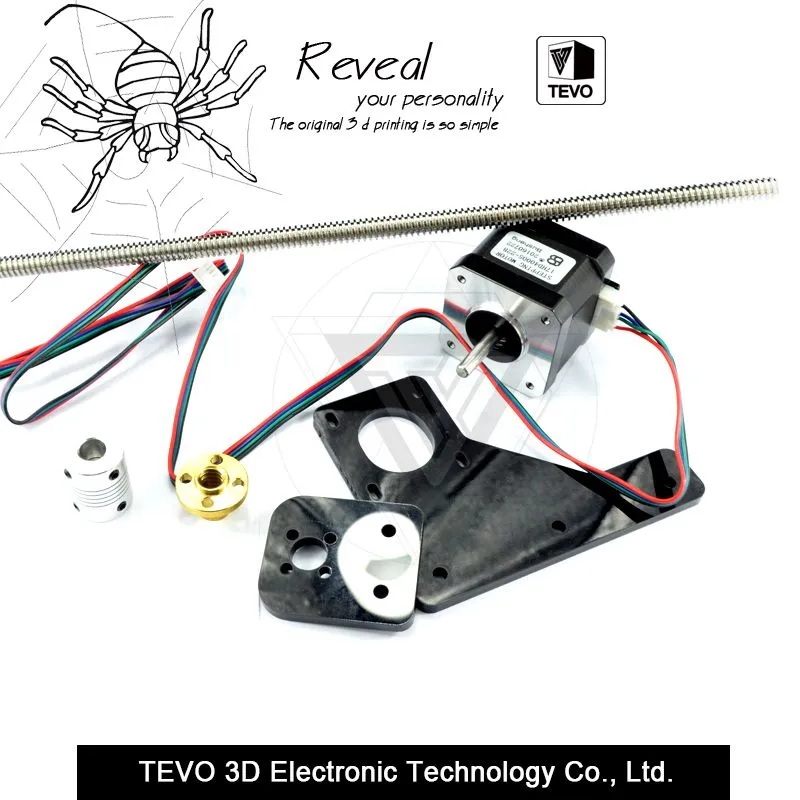
Identifying the Right Nema 17 Motors

Choosing the correct Nema 17 motors is crucial for a successful upgrade. Understanding the specifications of your existing motors and the requirements of your Tevo Tarantula is essential. There are a variety of Nema 17 motors available, each with different characteristics. Careful selection will ensure that your printer operates optimally after the upgrade. Proper research and a bit of technical knowledge will guide you towards the right choices. This section aims to provide the necessary information to select the ideal Nema 17 motors for your specific needs, ensuring a positive upgrade outcome.
Motor Specifications
Key specifications to consider when selecting Nema 17 motors include voltage, current, step angle, and holding torque. Voltage and current ratings must match the power supply and the stepper motor drivers on your Tevo Tarantula’s control board. A common voltage is 12V or 24V. The step angle (typically 1.8 degrees per step) determines the resolution of the motor’s movements. Holding torque, measured in ounce-inches or Newton-meters, indicates the motor’s ability to resist external forces. Higher torque provides more power, which can improve the printer’s precision and the ability to handle faster print speeds. It’s critical that the specifications of your motors are properly researched and are in sync with the machine.
Voltage and Current Requirements
The voltage and current requirements of your Nema 17 motors must align with your printer’s power supply and the stepper motor drivers on the control board. Verify the voltage output of your power supply and the current limit of your drivers. Most Tevo Tarantulas use 12V or 24V power supplies, so select motors that match. The current rating of the motors should also align with your drivers. It is important to make sure that the drivers are able to supply enough current without overheating or damaging the motors. Consult your printer’s manual or the control board documentation to find the correct specifications. Failing to do so can lead to underperformance or damage to the components.
Step Angle and Holding Torque

The step angle of Nema 17 motors usually is 1.8 degrees per step, which provides a good balance between resolution and speed. However, some motors may have a different step angle, so it’s important to check. The holding torque of the motor is a crucial factor, and higher torque usually leads to improved print quality and the ability to print at higher speeds. The right motor will provide sufficient torque to accurately move the print head and the build platform. Consider the types of prints you plan to create when choosing a motor. More demanding prints may require higher holding torque. Make sure to factor in the importance of resolution and the specific requirements of your projects.
Choosing Compatible Motors
Beyond the technical specifications, consider factors such as motor dimensions, mounting options, and the type of connectors. These aspects will ensure the motors physically fit your printer. Verify the motor dimensions against the mounting points on your Tevo Tarantula. Also check the connector type. Different motors use different connectors. If the connectors don’t match, you may need to crimp new connectors or use adapter cables. Opting for motors with the same mounting pattern and connector type as the original motors can simplify the installation process. It is important to properly research the model of motor to guarantee compatibility, ensuring an easy and effective upgrade.
Motor Dimensions and Mounting
Ensure the Nema 17 motors you select have compatible dimensions and mounting holes with your Tevo Tarantula. Most Nema 17 motors use a standard mounting pattern, but double-check the specifications to be sure. The motor’s length also needs to be considered to avoid interference with other components on the printer. Verify that the motors fit within the space available on your printer’s frame and that they can be securely mounted. The motor dimensions and mounting are key factors for a hassle-free installation. Properly installed motors will ensure that everything fits correctly, leading to a smooth and reliable upgrade.
Wiring and Connector Compatibility

Pay close attention to the wiring and connector compatibility of the Nema 17 motors. Ensure the motors have the same type of connector as your existing wiring harness or that you have the correct adapter cables. Proper wiring is crucial for correct motor operation. Incorrect wiring can lead to malfunctions or damage. Familiarize yourself with the motor’s wiring diagram and ensure the wires are connected to the correct terminals on the control board. Using compatible wiring and connectors will facilitate a clean, easy, and secure connection. Before attempting to print, inspect all wiring connections thoroughly to minimize the risk of shorts.
Tools and Materials Needed
Before starting the upgrade, gather all the necessary tools and materials. Having everything prepared will streamline the process and prevent unnecessary delays. Preparation will make the entire procedure more efficient and less frustrating. It is best to set up a clean workspace and carefully organize your tools and materials. This will provide a productive and safe environment for the upgrade. Make a detailed list of every part and tool that you will need.
Required Tools
Essential tools include a set of Allen wrenches, a screwdriver set, wire strippers and crimpers, and a multimeter. The Allen wrenches are needed for removing and installing the motors, while screwdrivers are used for disassembling the printer. Wire strippers and crimpers are essential if you need to modify the wiring or attach new connectors. A multimeter will help to test the continuity of the wires and to confirm the proper wiring. It’s also advisable to have a pair of pliers, wire cutters, and possibly a soldering iron if you need to make any wiring modifications. Having the right tools at your disposal will make the process much easier and more efficient.
Materials and Components

Besides the Nema 17 motors, you may need to have some additional components. This might include replacement connectors, wire, or possibly a new motor mount. Ensure you have the proper wiring and any adapters required for your printer. Extra zip ties can be useful for securing the wires and creating a neat setup. Having a spare set of screws can be useful. Keep some electrical tape to insulate any exposed wires or connections. Prepare all of the materials to make sure that you have everything you need before you start. This will ensure a smooth upgrade.
Step-by-Step Upgrade Guide
With the necessary tools and materials ready, follow these steps to replace the stock motors with Nema 17 motors. The upgrade process involves physical installation, wiring, and firmware configuration. Careful attention to detail and patience will help to ensure a successful upgrade. Each step of the guide will help to ensure that the installation goes smoothly. Following the steps closely is essential to avoid damaging the printer or the new motors. Take your time and methodically work through each step.
Preparing the Tevo Tarantula
Before starting, power off and unplug the Tevo Tarantula. Disconnect the power supply and any cables from the control board. Make sure to organize the work area. Remove the printer’s panels or covers to gain access to the motors. Take photos of the wiring connections and motor positions to help you during reassembly. A clean, well-lit workspace will make the process easier. Taking photos to document the process will prove helpful if you get lost. This is a good step to avoid mistakes and make sure that you’re able to put everything back together. These steps prepare the printer for the upgrade process.
Removing the Old Motors

Carefully remove the existing stepper motors. Loosen the screws holding the motors in place and detach them from the printer frame. Disconnect the wiring from the motors, taking care to note the wiring order. Disconnect and remove the belts from the pulleys on the motors, if applicable. Keep all the screws and components organized to make sure that you have everything that you need during the reassembly. Take your time and avoid applying excessive force. Organize the old parts to make sure they are easy to access in case you need them later.
Installing the New Nema 17 Motors
Mount the new Nema 17 motors to the printer frame, using the existing mounting holes if possible. Ensure the motors are securely attached, to prevent movement during operation. If the mounting holes don’t align, you may need to modify the frame or use motor mounts. Tighten the screws securely, but don’t overtighten them. Double-check the alignment to ensure smooth operation. The alignment is critical to avoid issues. Take your time when installing the motors, and make sure they are properly aligned. Ensure that the motors are positioned correctly for optimal performance.
Wiring and Connecting the Motors
Connect the motor wires to the control board. Refer to the wiring diagram from the old motor or the motor documentation. Make sure that the wiring is correct. Incorrect wiring can damage the motors or the control board. If the connectors are different, you might need to crimp new connectors or use adapter cables. Ensure the wiring is securely connected and that no wires are exposed. Neat wiring will improve the look, as well as minimize the risk of electrical shorts. Double-check all wiring connections to make sure they are correct before powering the printer on.
Configuring the Firmware
After the physical installation is complete, adjust your printer’s firmware. This is necessary to ensure that the printer knows the new motor’s specifications. The most important parameters to configure are the motor current and the steps per millimeter. Change these settings using the printer’s control panel or by editing the firmware directly. Make sure that you have the correct settings for your new motors and stepper drivers. Incorrect settings can cause the prints to be misaligned or have print quality issues. Recalibrate your printer after the firmware configuration. Check the motor current settings in the firmware to ensure that the motors are getting the proper power. Save the firmware settings and reboot the printer.
Testing and Calibration
After the hardware installation and firmware adjustments, test the new motors. Perform several calibration tests to ensure that the printer is operating correctly. Carefully calibrating the machine ensures that the printer performs optimally and produces high-quality prints. Taking the time to calibrate the printer correctly is a vital step. You must make sure that you make fine-tuned adjustments.
Initial Test Prints
Start with a simple test print, such as a calibration cube or a small model, to evaluate the performance. Monitor the print quality, looking for any issues such as layer shifting, over-extrusion, or under-extrusion. Check the movements of the printer. Test the prints to identify any problems, or areas of improvement. Use this step to make sure that the printer is working correctly. If there are issues, review the motor connections and firmware settings. The initial test prints help to identify any issues before starting more complex prints. They are a vital component in your first time using the new motors.
Adjusting Motor Currents
Properly adjust the motor current settings in the firmware. If the motors are running too hot or skipping steps, adjust the current until the motors are functioning optimally. Increase or decrease the motor current incrementally, and monitor the motor temperature and performance during printing. Refer to your stepper motor driver’s documentation. Make sure to never exceed the driver’s or motor’s current limit. The motor current settings should be optimized. Proper adjustments will improve the print quality. Ensure that the motors are receiving the correct amount of power. Making the correct adjustments will extend the life of your motors and improve performance.
Troubleshooting Common Issues
During the upgrade, you might encounter some common issues. Layer shifting can occur if the motor current is too low or the belts are not properly tensioned. If the prints are coming out with poor quality, check the wiring and the firmware settings. If the motors are overheating, make sure that the current settings are correct. If the motors are making strange noises, verify that they are properly aligned and not rubbing against any other components. Consult online forums, and other resources to find solutions. Proper troubleshooting can solve most problems. Check the connections and settings to ensure that everything is operating correctly.
Upgrading the Tevo Tarantula with Nema 17 motors is a rewarding project. By following this guide, you can improve your printer’s performance and achieve higher-quality prints. Proper preparation, careful installation, and methodical troubleshooting will ensure that the upgrade is successful. After completing the upgrade, you’ll find that your 3D printing experience is significantly enhanced, opening up new possibilities for your projects. With upgraded motors, you’re well on your way to producing high-quality prints and enjoying the world of 3D printing. The results will be well worth your time and effort.