What is the Tevo Tarantula Kit
The Tevo Tarantula is a popular and affordable 3D printer kit, making it an excellent entry point for beginners eager to delve into the world of additive manufacturing. This kit offers a hands-on experience, allowing users to assemble the printer themselves, gaining valuable knowledge about its inner workings. The Tevo Tarantula kit provides a great balance of features and price, making it accessible to hobbyists, students, and anyone looking to explore 3D printing without a huge investment. It’s a fantastic way to learn about 3D printing technology and start creating your own models and prototypes.
Key Features of the Tevo Tarantula
The Tevo Tarantula kit boasts several key features that contribute to its popularity. It typically includes a heated bed, which is crucial for printing with materials like ABS that require a controlled temperature to prevent warping. The open-frame design provides easy access to the printer’s components, simplifying maintenance and upgrades. Many kits come with a standard build volume, offering ample space for various printing projects. The printer often utilizes a reliable and straightforward control board, contributing to ease of use. Overall, the Tevo Tarantula offers a robust set of features that are well-suited for beginners, ensuring a rewarding and educational 3D printing experience.
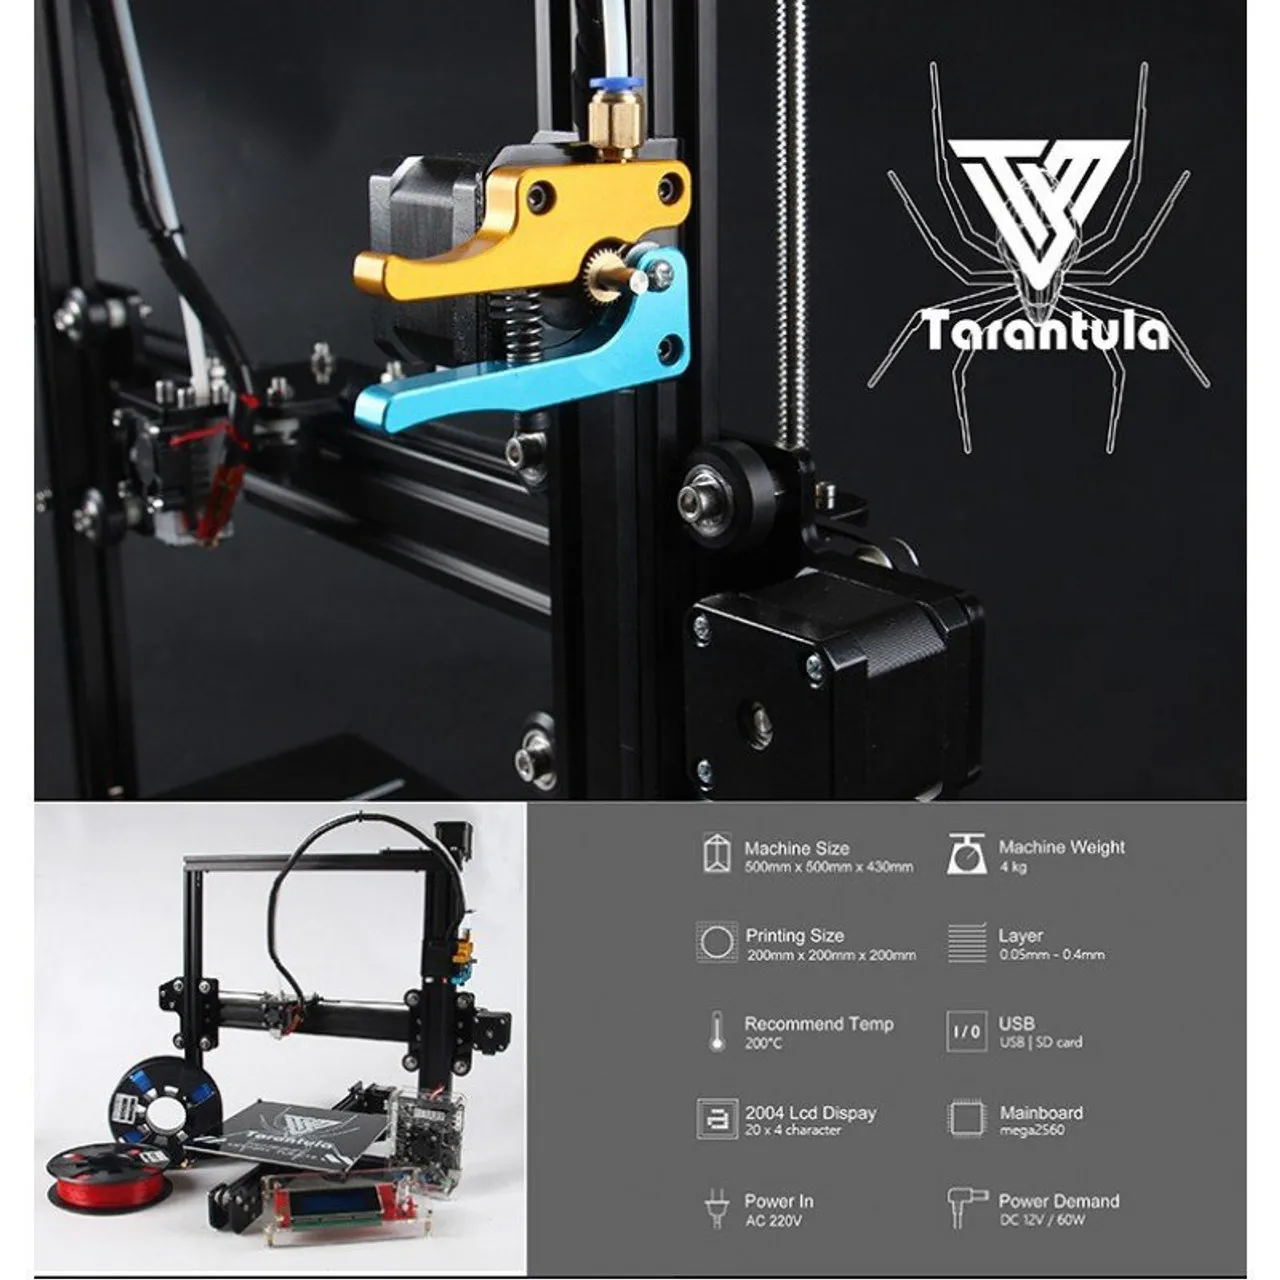
Technical Specifications

Understanding the technical specifications is key to making the most of your Tevo Tarantula. Common specifications include a build volume that defines the maximum size of your prints, often around 200x200x200mm. The printer typically operates on a 12V or 24V power supply, which is something to consider during assembly. It typically supports various filament diameters, most commonly 1.75mm. The nozzle size dictates the detail and speed of printing; a 0.4mm nozzle is standard, but you can upgrade to different sizes for different print results. The printer’s firmware is usually open-source, enabling customization and upgrades. Knowing these specifications helps you choose the right filament, adjust settings, and maintain your 3D printer effectively.
Assembly Guide for Tevo Tarantula Kit
Assembling the Tevo Tarantula is a rewarding process. This section provides a comprehensive guide to help beginners successfully build their printer. The process involves multiple steps, each crucial for the final performance. Careful attention to detail is important to avoid issues during the printing process. Follow these steps and tips, and you will be able to successfully build your printer.
Unboxing and Preparation
Unboxing the Tevo Tarantula is the first exciting step. Carefully unpack all components, making sure everything listed in the kit is present. Organize all the parts and refer to the included manual. The kit usually contains various components, including frame parts, electronics, and hardware. Take inventory of all items and ensure you have all the tools. Organize your workspace, setting up a clean area to work on. This is a great way to ensure you do not misplace any of the components during assembly. This initial organization will save time and make the entire process much easier.
Step-by-Step Assembly Process

The assembly process is relatively straightforward but demands patience. Start by assembling the frame according to the manual, connecting the various structural components. Next, mount the heated bed and ensure it’s securely in place. Attach the Z-axis components, including the stepper motors, threaded rods, and end-stop sensors. Then, install the X and Y-axis components, including the belts, pulleys, and end-stop sensors. Make sure the belts are properly tensioned. Connect all the components in the right order and ensure all screws are fastened properly. Refer to the manual, watching videos, and seeking online support if you encounter any issues.
Wiring and Electronics Setup
Wiring is a critical part of the assembly, requiring precise connections to prevent short circuits. Connect the stepper motors to the control board, following the wiring diagram in the manual. Connect the heated bed, hot end, and other components to their designated terminals. Double-check all connections and ensure they are secure. Use electrical tape to insulate any exposed wires. Be cautious when handling the power supply and other electrical components. Many people prefer to watch videos or seek help from others for this part. It’s essential to follow the instructions carefully. A well-wired printer is important to ensure a smooth printing process.
Calibration and First Print
Calibration is critical for achieving high-quality prints. This section provides guidance on how to calibrate your printer to achieve optimal results. Proper calibration leads to smooth prints without any issues, and provides great prints. It is a very important step in setting up your 3D printer.
Bed Leveling Techniques

Bed leveling is one of the most important steps in the calibration process. It ensures the nozzle is at the correct distance from the print bed across the entire surface. Manual bed leveling involves adjusting the bed’s height using the leveling screws until the nozzle is at the right height. This process can be aided by using a piece of paper as a gauge. Automatic bed leveling is also possible with sensor upgrades. Ensure the bed is heated to the recommended temperature for your chosen filament. Proper bed leveling prevents the print from sticking to the bed and helps prevent warping. Many beginner kits come with manual bed leveling, which is very straightforward.
Filament Selection and Settings
Choosing the right filament and settings is key for successful prints. PLA is a popular choice for beginners because of its ease of use and low printing temperature. ABS requires a higher temperature and is more prone to warping. PETG offers a good balance of strength and flexibility. Set the correct nozzle temperature, bed temperature, and print speed according to the filament being used. Adjust settings in the slicing software to optimize print quality. Experimenting with different filaments and settings will allow you to achieve the desired print results. Always consult the filament manufacturer’s guidelines for specific settings.
Troubleshooting Common Issues
Even with careful setup, you may encounter issues. Being able to troubleshoot these is essential. This section covers troubleshooting common problems such as nozzle clogging, printing quality issues, and more. By following these tips, you can ensure a smooth printing experience.
Nozzle Clogging and Filament Problems

Nozzle clogging is a frequent issue, especially when printing with certain filaments. Clogging can be caused by filament debris, incorrect temperatures, or other factors. To resolve this, you may need to use a cleaning needle to clear the nozzle, or replace the nozzle. Filament can also cause problems if it is old, damp, or improperly stored. Store your filament in a dry, cool place and try to avoid moisture. If the filament is too old, you may need to discard it. A hot end clog can sometimes cause a complete print failure. Inspect the filament and the hot end frequently.
Printing Quality Issues
Printing quality issues include poor layer adhesion, warping, and stringing. Warping can be addressed by using a heated bed or using an enclosure. Stringing can be reduced by adjusting the retraction settings in the slicing software. Poor layer adhesion can be caused by incorrect temperatures or other settings. Adjusting these settings can improve the quality of your prints. Further adjustments to your settings will improve the quality. Always review your prints and make sure you understand the issues you are experiencing.
Software and Slicing for Tevo Tarantula
Slicing software is necessary for converting 3D models into instructions your printer can understand. Choosing the right software and configuring it correctly are critical for optimizing print quality and efficiency. This section covers software, slicing, and configuration.
Choosing the Right Slicer

Several slicing software options are available, including Cura, PrusaSlicer, and Simplify3D. Cura is a popular choice for beginners, offering a user-friendly interface and a vast array of features. PrusaSlicer is another excellent option, known for its advanced features. Simplify3D is a professional slicer, offering more control over print settings. Consider your experience level and the features you need when choosing a slicer. Most slicers are free to use, making it easy to experiment with different options.
Configuration for Optimal Prints
Proper configuration of the slicing software is essential for achieving optimal print quality. Input your printer’s specifications, including build volume, nozzle size, and heated bed settings. Adjust print speed, layer height, and infill density based on the model and filament being used. Experiment with different support structures if needed. Optimize retraction settings to reduce stringing. Fine-tune settings to improve the quality of your prints. Refer to online tutorials and communities for recommendations. Review the documentation for specific configurations for certain models or filaments.
Maintenance and Upgrades for the Tevo Tarantula
Proper maintenance and upgrades will extend the life and enhance the performance of your Tevo Tarantula. Performing routine maintenance is necessary to achieve high-quality prints. You can also perform certain upgrades to help improve performance. This section reviews the maintenance and upgrades you can perform on your 3D printer.
Regular Maintenance Tasks
Regular maintenance is important to keeping your 3D printer in good working order. Clean the printer regularly, removing dust and debris. Lubricate the moving parts, such as the Z-axis rods, to ensure smooth movement. Check and tighten screws. Inspect and clean the nozzle. Regularly check and replace worn-out parts. Proper maintenance will keep your 3D printer running smoothly. Performing maintenance will help prevent problems in the future.
Popular Upgrades and Enhancements
The Tevo Tarantula is a versatile printer that can be enhanced with upgrades. Upgrade the hot end for improved temperature control. Install a glass bed for better adhesion and a smoother printing surface. Add a BLTouch auto-leveling sensor for easier bed leveling. Upgrade the control board for quieter operation and advanced features. These upgrades will improve the print quality and your overall printing experience. Several online communities offer recommendations for upgrades. Carefully research upgrades and choose the best ones.
Conclusion — Final Thoughts
The Tevo Tarantula is an excellent 3D printer kit for beginners. By following this guide and spending time with your new printer, you will soon be able to print high-quality models. Proper setup and maintenance are important. The Tevo Tarantula offers a rewarding learning experience. You will also learn about 3D printing technology, leading to exciting and creative opportunities.