Choosing the Right Build Plate for Your Tevo Tarantula
The Tevo Tarantula is a popular 3D printer, known for its affordability and versatility. One of the most critical aspects of successful 3D printing with the Tevo Tarantula, or any 3D printer, is the build plate. This is the surface where your prints adhere and solidify. The original build plate that comes with the Tevo Tarantula, like most budget printers, can be improved upon. Upgrading your build plate can dramatically enhance print quality, reduce warping, and simplify the printing process. Several build plate upgrades are available, each with its own set of advantages. Choosing the right one depends on your specific needs and the types of materials you intend to print with.
Understanding Build Plate Materials
Different build plate materials offer varying levels of performance in terms of adhesion, heat resistance, and ease of use. Understanding the properties of each material is key to making an informed decision. Common materials include glass, PEI (Polyetherimide), and magnetic surfaces. These materials influence how well the initial layers of your print stick, how easy it is to remove the finished print, and how well the build plate can handle the heat required for different filament types.
Glass Build Plates

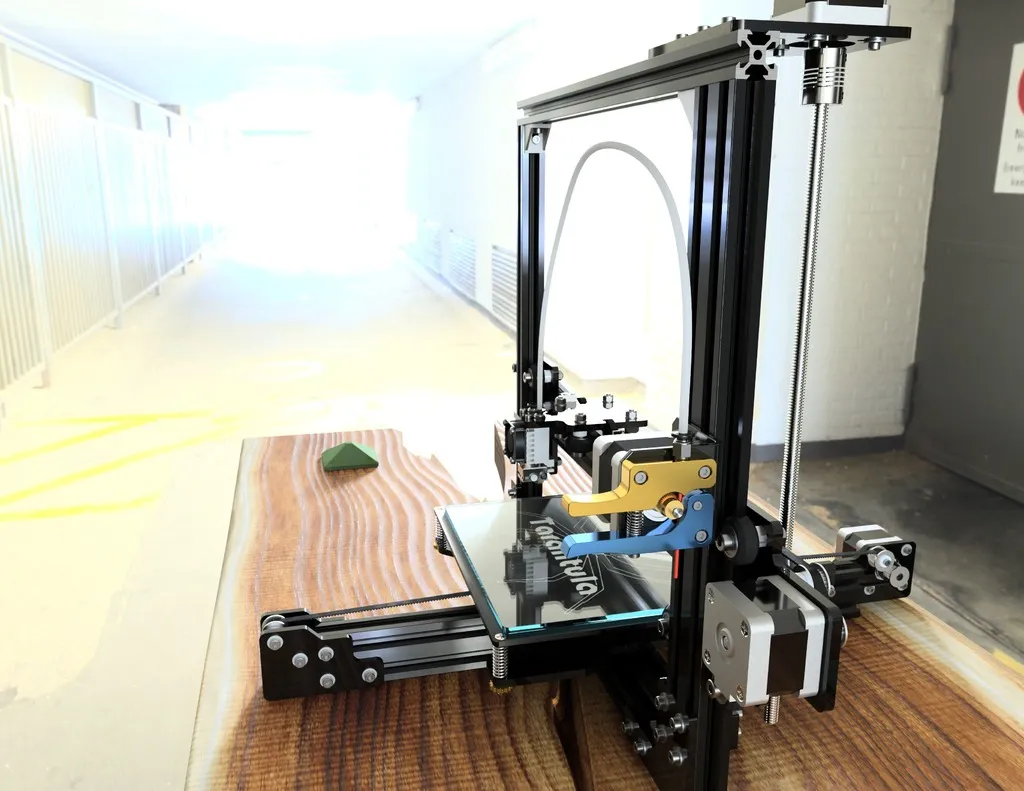
Glass build plates are a popular choice, offering a smooth, flat surface ideal for creating a clean first layer. They distribute heat evenly, which helps to prevent warping. Glass is also relatively inexpensive and widely available, making it an accessible upgrade for many Tevo Tarantula owners. With proper preparation, such as applying an adhesive or using painter’s tape, glass plates can provide excellent adhesion for a variety of filaments.
Pros and Cons of Glass Plates
Pros of glass build plates include a smooth printing surface, even heat distribution, and affordability. The cons include the need for adhesives, potential difficulty in print removal if not prepared correctly, and the risk of breakage if not handled carefully or if subjected to extreme temperature changes. Despite these considerations, glass remains a solid choice for many.
PEI Build Plates
PEI build plates are another excellent option, known for their excellent adhesion properties and durability. PEI, a type of plastic, provides a surface that prints tend to stick to very well when hot and release easily when cooled. They require minimal preparation, often eliminating the need for adhesives. This ease of use makes PEI a favorite among both beginners and experienced users. The PEI surface can be purchased as a sheet or as a coating on a flexible steel plate, adding to the overall convenience.
Pros and Cons of PEI Plates

The pros of PEI plates include exceptional adhesion, ease of use, and the ability to print directly on the surface without additional adhesives. The cons are the initial cost can be higher, and the surface can be susceptible to scratches if not handled carefully. Despite the potential for scratches, the benefits often outweigh the drawbacks for many users.
Magnetic Build Plates
Magnetic build plates offer a convenient solution, combining a flexible steel sheet with a magnetic base that attaches to the printer’s bed. This allows for easy removal of prints by simply flexing the plate. Magnetic plates are typically coated with PEI or another material to provide good adhesion. This system is highly user-friendly, allowing you to quickly remove prints without the use of scrapers or other tools. They are becoming increasingly popular due to their ease of use and efficiency.
Pros and Cons of Magnetic Plates
Pros of magnetic build plates include easy print removal, good adhesion, and convenience. Cons can include the initial cost, potential for wear and tear on the magnetic surface over time, and the requirement to ensure the magnetic base is securely attached to the printer’s bed. The ease of use often makes this an excellent choice.
Upgrading to a Heated Build Plate

A heated build plate is a must-have upgrade, especially if you plan to print with materials like ABS, PETG, or nylon. Heating the build plate helps to prevent warping and improves layer adhesion. The Tevo Tarantula’s original build plate typically includes a heating element, but upgrading to a more powerful or evenly heated plate can further enhance your print quality. Ensuring your bed reaches the correct temperature for the chosen filament is essential for optimal printing.
Benefits of a Heated Bed
The primary benefits of a heated bed include reduced warping, improved layer adhesion, and the ability to print with a wider range of materials. Warping, which is the tendency of prints to curl up at the edges, is a common problem, particularly with ABS. A heated bed helps to maintain a consistent temperature throughout the print, preventing this issue. Improved layer adhesion is also critical, as it ensures the print’s structural integrity. The right temperature can significantly improve the success rate of your prints.
Installation Guide for a Heated Bed
Installing a heated bed typically involves replacing the existing bed with a new one, connecting the wiring to the printer’s control board, and adjusting the firmware settings to reflect the new bed’s specifications. Always turn off the power and disconnect the printer before beginning any electrical work. Follow the manufacturer’s instructions carefully, and ensure all connections are secure to avoid electrical hazards. You will likely need to calibrate your Z-offset and possibly adjust the PID settings for the new bed.
Improving Bed Adhesion

Good bed adhesion is crucial for successful 3D printing. Without proper adhesion, the print will detach from the build plate during the printing process, leading to failed prints. There are several techniques and tools you can employ to improve adhesion and achieve perfect first layers. It is important to select the right material for the specific filament to optimize print adhesion.
Cleaning Your Build Plate
Keeping your build plate clean is a fundamental step in ensuring good adhesion. Remove any debris, such as old filament residue or dust, which can interfere with the first layer adhesion. Clean your build plate regularly with isopropyl alcohol (IPA) to remove oils and other contaminants. For glass beds, you can use a glass cleaner or a mild soap solution. Keeping the surface clean is key to improving the success rate of your prints.
Using Adhesives for Better Adhesion
Various adhesives can enhance adhesion, particularly with glass or other smooth surfaces. Glue sticks, hairspray, and painter’s tape are commonly used. For materials like ABS, a slurry made from ABS filament and acetone can work wonders. Apply a thin, even layer of the adhesive to the build plate before printing. Ensure the adhesive is compatible with your filament and follow the manufacturer’s instructions for application and use.
Leveling Your Build Plate

Proper bed leveling is arguably the most critical step in achieving good adhesion and successful prints. An unleveled bed can result in the nozzle being too close or too far from the build plate, leading to poor first-layer adhesion or nozzle damage. There are several methods for leveling your build plate, ranging from manual adjustments to automated systems.
Manual Bed Leveling
Manual bed leveling involves adjusting the leveling screws on the build plate until the nozzle is at the correct distance from the bed across the entire surface. Use a piece of paper or a feeler gauge to check the distance between the nozzle and the bed at various points. Move the nozzle to each corner and the center of the bed, making adjustments as needed. This process requires patience and practice, but it is an essential skill for any 3D printing enthusiast.
Using Bed Leveling Sensors
Bed leveling sensors automate the leveling process, making it much easier and more accurate. These sensors can be inductive, capacitive, or use a physical probe to measure the distance between the nozzle and the bed. The printer’s firmware uses the sensor data to compensate for any unevenness in the bed, ensuring that the first layer is perfectly adhered. While these sensors require some initial setup, they can significantly improve print success rates and save time.
Upgrading Build Plate Size

If you frequently print large objects, upgrading the build plate size may be an option. A larger build plate will increase the maximum print volume of the Tevo Tarantula, allowing you to create larger models. This upgrade requires a few considerations, including the printer’s frame stability, the heating capacity of the bed, and the capabilities of the printer’s power supply.
Considerations for Larger Build Plates
When upgrading to a larger build plate, ensure that your printer’s frame is rigid enough to handle the added weight and stress. The heating element must be able to heat the larger surface evenly, and the power supply should provide enough power to operate the heated bed. You may also need to upgrade the firmware to accommodate the new print area. Ensure that the new size fits within the physical constraints of your printer.
Finding the Right Plate for Your Print Needs
Choosing the right build plate for your Tevo Tarantula depends on your printing needs. Consider the types of filaments you intend to use, the desired print quality, and your budget. For general use, a PEI-coated or magnetic build plate is often a great choice due to their ease of use and versatility. If you primarily print with ABS or other materials that require higher temperatures, a heated bed is essential. Understanding the pros and cons of each build plate type will help you make an informed decision. Start with the basics, and as you gain experience, you can experiment with different materials and setups.