Embarking on the Tevo Tarantula assembly journey can seem daunting at first, but with the right guidance, it’s a rewarding experience that culminates in your own functional 3D printer. This comprehensive guide will walk you through every step, from unpacking the box to your first successful print. We’ll cover the essential tools, detailed assembly instructions, calibration tips, and troubleshooting techniques. This guide is designed for beginners, ensuring a smooth and enjoyable assembly process. Get ready to bring your 3D printing dreams to life by assembling your Tevo Tarantula printer. Each step is explained in detail, ensuring you understand the process and can tackle any challenges that arise during the build. Let’s dive into how to successfully assemble your Tevo Tarantula and start creating amazing 3D models.
What You’ll Need for Tevo Tarantula Assembly
Before you start the Tevo Tarantula assembly, gather all the necessary tools and materials. Having everything prepared beforehand will make the process much smoother and more efficient. Double-check the parts list provided with the printer to ensure you have all the components. It’s also a good idea to have a well-lit workspace and a clear area to work in to prevent losing small parts. Organize the components as you unpack them. This will save time and minimize frustration during the assembly process. Careful preparation is the first step towards a successful Tevo Tarantula assembly. Make sure you have all the parts and tools ready for the build.
Tools and Materials Checklist
- Screwdrivers (Phillips head and flathead)
- Allen wrenches (usually included with the kit)
- Wire cutters and strippers
- Needle-nose pliers
- Multimeter (for testing electrical connections)
- Zip ties or cable ties (for cable management)
- 3D printer filament (for testing and printing)
- Isopropyl alcohol (for bed cleaning)
- Painter’s tape or other bed adhesive (optional)
Step-by-Step Assembly Guide

Now, let’s get into the core of the Tevo Tarantula assembly. Follow these steps carefully, taking your time to ensure each part is correctly installed. Refer to the Tevo Tarantula manual if you have any questions or doubts. Each step is critical for the printer’s functionality and the quality of your prints. If you have never assembled a 3D printer before, it might be better to take a video of the build step by step so that you can go back and review your build, or if you need to troubleshoot.
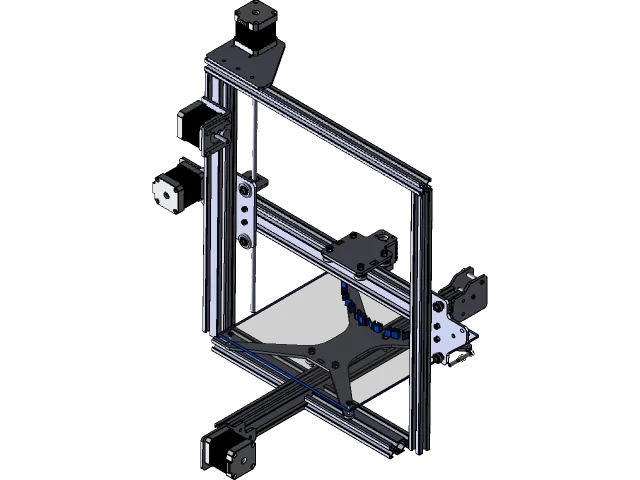
Preparing the Frame
The frame is the foundation of your Tevo Tarantula. Assemble the frame by connecting the various aluminum extrusions according to the manual. Ensure all screws are tightened securely, but avoid over-tightening, which can strip the threads. The frame should be square and stable before moving on to the next step. Use a level to make sure the frame is not crooked. Properly preparing the frame is crucial for the overall stability and accuracy of the printer.
Assembling the Base
Attach the base components to the frame. This typically involves mounting the heated bed, the Y-axis rails, and the Y-axis motor. Ensure that the heated bed moves smoothly along the Y-axis rails. Adjust the belt tension for optimal performance. The base must be stable and level to achieve great prints. Make sure the Y-axis belt is not too loose or too tight to prevent issues during printing.
Attaching the Z-Axis

The Z-axis controls the vertical movement of the print head. Attach the Z-axis components, including the threaded rods, stepper motors, and the Z-axis frame. Ensure that the Z-axis moves smoothly up and down without binding. Make sure the Z-axis is properly aligned and the threaded rods are straight. Correct Z-axis assembly is essential for consistent layer heights in your prints. Take your time, and make sure the rods are aligned straight. If the Z-axis rods are bent you may have some issues.
Mounting the X-Axis and Extruder
The X-axis carries the print head and extruder. Attach the X-axis to the Z-axis frame, making sure it moves smoothly along the rails. Mount the extruder, ensuring it is properly aligned and the filament path is clear. Double-check the tightness of the belt on the X-axis, so that you do not have any issues with movement during printing. Careful mounting of the X-axis is key to precise movements.
Wiring the Electronics
This step involves connecting the various electronic components. Follow the wiring diagrams provided with the Tevo Tarantula kit. Ensure all connections are secure and properly insulated. Properly wiring the electronics is very important to prevent damage to your printer or risk of an electric shock. Take your time and be sure to connect all the wires correctly.
Connecting the Motors and Endstops

Connect the stepper motors for the X, Y, and Z axes, and the extruder, to the appropriate drivers on the control board. Connect the endstops to determine the printer’s home position. Make sure each connection is secure. Ensure the endstops are correctly wired and positioned for accurate homing.
Wiring the Hotend and Bed
Connect the hotend (nozzle heater) and the heated bed to the control board. Make sure the wiring is heat-resistant and properly secured. Double-check the polarity of the connections to avoid damaging the components. Ensure that the hotend and bed heaters are correctly wired to the power supply. Be very careful when wiring the bed, as the voltage can be dangerous.
Calibrating and Testing
After assembling the Tevo Tarantula, calibrate the printer to ensure it’s ready for printing. This involves leveling the bed, testing the motors and endstops, and setting up the first print. Accurate calibration is essential for successful prints. Be sure to test your printer after each major step, so that you can track if something went wrong during your build. If something breaks you can replace a part.
Leveling the Bed

Leveling the bed is crucial for the first layer adhesion. Use the leveling screws to adjust the bed height at each corner. Ensure the nozzle is a consistent distance from the bed across the entire surface. A properly leveled bed ensures that the first layer of the print adheres correctly. Use a piece of paper to make sure the bed is level, and the nozzle is not too high, or too low.
Testing the Motors and Endstops
Use the printer’s control panel or software to test the movement of each axis and the functionality of the endstops. Ensure the motors move smoothly and that the endstops are triggered correctly. Correct motor and endstop settings ensure the printer homes correctly and prevents collisions. If your motors are not aligned, or the endstops are not working your printer will have issues and will not print correctly.
First Print Setup
Load filament, set the nozzle and bed temperatures, and select a test print from your SD card. Monitor the first layer carefully to ensure it adheres to the bed properly. If the first layer is not sticking correctly, adjust the bed level or nozzle height. A successful first print confirms that the printer is assembled and calibrated correctly. If you have issues with your first print, go back and verify the steps that you took.
Troubleshooting Common Issues

Even with careful assembly, you may encounter some common issues. Here are some troubleshooting tips for common problems. Reviewing these issues before starting assembly will help you identify and solve any problems faster. Do not give up, and take your time.
Extruder Problems
If the extruder is not feeding filament, check for clogs in the nozzle, incorrect temperature settings, or a loose extruder gear. Ensure the filament is properly loaded and the extruder motor is functioning. Clogs can be cleared by heating the nozzle and using a needle to push out the blockage. Extruder problems are common, so do not be alarmed if you have to unclog the nozzle.
Bed Adhesion Issues
If the print is not sticking to the bed, check the bed level, bed temperature, and nozzle height. Use bed adhesives like painter’s tape or glue stick for better adhesion. Ensure the first layer is being laid down correctly. Proper bed adhesion is critical for successful prints. If you are having adhesion issues, then level your bed and check your z-axis settings. Also make sure that you preheat the bed, and use a bed adhesive.
Motor and Movement Problems

If the motors are not moving correctly, check the wiring, the motor drivers, and the belt tension. Make sure the endstops are working and the firmware settings are correct. Loose belts can also cause printing issues. Troubleshoot each axis individually to identify the problem. Review the wiring, and the firmware settings on the control panel.
Congratulations! You’ve completed the Tevo Tarantula assembly. Enjoy the process of creating amazing 3D prints. Happy printing!