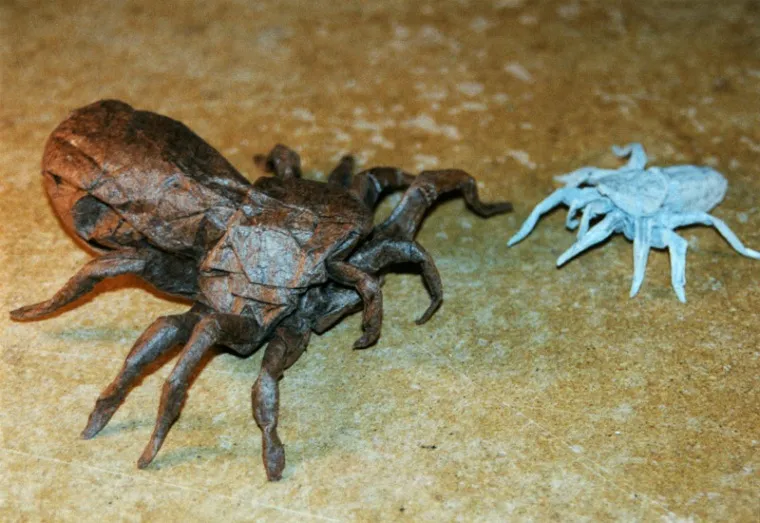
Embark on an exciting paper-folding adventure with our Origami Spider Tarantula Tutorial! Origami is a fantastic craft that combines precision and creativity, allowing you to transform simple sheets of paper into amazing three-dimensional figures. This tutorial will guide you step by step, helping you create your very own realistic origami spider tarantula. Whether you’re a seasoned origami enthusiast or a complete beginner, this guide will help you master the folds and bring this fascinating creature to life. Get ready to amaze your friends and family with your paper-folding skills!
What You’ll Need Origami Spider Tarantula
Before you start, gather your materials. The beauty of origami is its simplicity; you don’t need much to get started. For this origami spider tarantula, you’ll only need a few essential items. The most important is a square piece of paper. The size of the paper determines the size of your final spider. Choose paper that’s not too thick, as this will make folding more difficult. Origami paper, specifically designed for this craft, is ideal. Ensure you have a flat surface to work on, good lighting, and patience. A pair of scissors might be handy for precise cuts, though most folds in origami are done without cutting. Now, you’re ready to begin your journey to create an origami spider tarantula!
Paper Selection Origami Spider Tarantula
The paper you choose significantly impacts the final look and feel of your origami spider tarantula. Origami paper is specifically designed for this craft, offering the perfect balance of flexibility and durability. It’s usually thin and has a smooth surface, making it easy to fold precisely. You can find origami paper in various colors and patterns, allowing you to customize your spider tarantula. For beginners, starting with a standard square origami paper (e.g., 6x6 inches or 15x15 cm) is recommended. As you gain experience, you can experiment with different types of paper, such as metallic or patterned paper, to give your spider a unique appearance. Consider paper that matches the color of tarantula, such as brown, black, or even a lighter shade.
Step 1 Folding the Legs

Folding the legs is the first crucial step in creating your origami spider tarantula. Begin with a square piece of paper, and fold it diagonally to create a triangle. Then, open the paper and fold each corner to the center line, creating a pointed shape. Repeat this process on the other side. Now, fold each of the four points (which will form the legs) toward the center, but not all the way. The goal is to shape the legs with the right angles, giving them a realistic look. After the leg folds, turn the paper over. You should start seeing the legs taking shape. This is where precision matters. Ensure the folds are crisp and accurate, as this will determine the overall appearance of the spider’s legs.
Step 2 Creating the Body
With the legs partially folded, it’s time to create the body of the origami spider tarantula. Start by folding the top and bottom edges of the paper towards the center line, creating a rectangle shape. This will be the body of your spider. Then, make a series of mountain folds and valley folds to add dimension to the body, making it appear more realistic. This can involve folding the paper in half, and then unfolding it, or folding the sides to meet in the middle. Experiment with the folding to give your spider a more rounded or flattened body, depending on your preference. The body of the spider should be proportionate to the legs, giving it a balanced appearance. Pay close attention to the folds to ensure the body is sturdy and will support the legs.
Step 3 Assembling the Spider
Now comes the exciting part: assembling the origami spider tarantula. Carefully open the folds you made earlier. Position the folded legs in a way that they are spread out to create the appearance of a spider standing. Ensure the legs are evenly spaced and facing outward. The body of the spider should be positioned above the legs, with the folded sections meeting at the center. This step involves strategic folding and unfolding to create a cohesive form. At this stage, your spider tarantula should start to take shape, showcasing the intricate detail of the folds. Check to make sure everything is aligned properly. This will make the next step – adding the finishing touches – much easier.
Step 4 Adding Detail to the Spider

To bring your origami spider tarantula to life, add some fine details. Use the tip of a pen or a scoring tool to add lines or textures on the body, mimicking the appearance of a tarantula’s fur. You can also use a marker to color the eyes, or add small details on the legs. Experiment with different shades of color to create a more realistic effect. Another great way to add detail is by gently curving the legs to add a more natural stance. This step is where you can get creative. Feel free to experiment with different techniques and materials to create a unique, personalized origami spider tarantula. The details are what will make your spider stand out.
Step 5 Finishing Touches
Once you’ve added the details, it’s time for the finishing touches. Carefully check your origami spider tarantula for any loose folds or areas that need adjustment. Ensure the legs are secure and the body is well-formed. Now, find a good spot to display your origami creation. Your origami spider tarantula is ready to be showcased! Consider taking a photo of your creation to share it with others. You can also create a whole family of origami spiders to build an impressive display. Remember, practice makes perfect. The more origami spiders you make, the better you’ll become at the craft.
Tips for Folding Origami Spider Tarantula
Here are some helpful tips to make the origami spider tarantula folding process smoother. First, always start with a clean workspace to avoid any distractions or accidents. Use a good quality paper and be patient, especially if you are a beginner. Take your time and make sure each fold is crisp and accurate, as precision is the key to a successful origami project. If you get stuck, don’t hesitate to consult online tutorials, diagrams, or videos. Consider practicing the folds on a scrap paper first to get a feel for the process. As you become more comfortable, experiment with different colors, paper types, and sizes to create unique spider tarantulas. Most importantly, enjoy the process. Origami is a relaxing and rewarding hobby that helps to develop creativity and fine motor skills.
Troubleshooting Common Issues

Like with any craft, you may encounter some challenges while folding your origami spider tarantula. One common issue is the paper tearing or ripping. To avoid this, use a good quality paper that is not too thin or too thick, and fold gently. Another issue is misaligned folds, which can make the final product look uneven. To fix this, double-check your folds and make sure they are aligned correctly before pressing down. If you find it difficult to understand the instructions, try watching a video tutorial, which can provide a clearer visual guide. Don’t get discouraged if your first attempt isn’t perfect. Origami takes practice. Keep trying, and you’ll soon be creating impressive paper spiders.
In conclusion, creating an origami spider tarantula is a fun and rewarding experience. From selecting your paper to adding the finishing touches, each step allows you to express your creativity and develop your origami skills. Embrace the journey and enjoy the process of transforming a simple piece of paper into a fascinating work of art. With the right materials, a little patience, and our step-by-step guide, you can successfully fold your very own origami spider tarantula. Happy folding!