Getting Started Drawing a Tarantula
Embarking on the journey of drawing a tarantula can seem daunting, but with this easy guide, beginners can learn to create impressive arachnid art. This guide breaks down the process into simple, manageable steps, making it accessible for everyone, regardless of their artistic experience. Drawing a tarantula is a rewarding experience. You will be able to learn about the anatomy of this incredible creature and apply various art techniques. This guide will cover everything from gathering the necessary art supplies to adding the final touches of texture and shading, so you can confidently bring your tarantula drawing to life. Prepare to unleash your inner artist and discover the joy of drawing this fascinating creature.
Gathering Your Art Supplies
Before you begin, gather your essential art supplies. Having the right tools will significantly enhance your drawing experience and help you achieve the desired results. The following sections outline the must-have art supplies to start drawing a tarantula. Getting your supplies ready is a great start to get you motivated. Make sure your table is clean and you have enough space to draw and place your supplies. Make sure you have good lighting, natural light is always best, but a lamp or other artificial light source works just as well.
Essential Drawing Tools

For a beginner, a simple set of tools is enough to start. You do not need fancy and expensive tools at the start. Start simple and experiment with various tools before investing in more specialized equipment. A good quality pencil set with varying degrees of hardness (2H to 6B) is essential for creating different line weights and shading effects. A good eraser is also crucial for correcting mistakes and creating highlights. A kneaded eraser is particularly useful for lifting graphite without damaging the paper. A blending stump or tortillon can help you to blend and soften your shading. A ruler can be used to create straight lines.
Choosing the Right Paper
The type of paper you choose can impact the quality of your drawing. For beginners, a smooth or medium-weight drawing paper is ideal. It provides a good surface for pencils to glide on and is generally forgiving for erasures. Avoid papers that are too textured, as they can make it difficult to achieve smooth shading. A sketchbook is good for the initial sketches and practices. Once you get comfortable, consider using better quality paper for finished drawings. Consider the paper’s weight, texture, and surface. These factors affect how well the pencil will glide on the paper and the final look of your drawing.
Basic Shapes to Start With
Before diving into the details of a tarantula, it’s beneficial to understand its basic anatomy. The tarantula’s body is segmented and has a distinct shape, which can be simplified into basic geometric forms. This simplification will help you to correctly position the legs, body, and other details. The body can be broken down into the cephalothorax (head and thorax) and the abdomen. The cephalothorax is often a rounded shape, while the abdomen is a bit more elongated and oval in shape. The legs and pedipalps (small appendages near the mouth) extend from the cephalothorax. Understanding these shapes will make it easier to correctly and accurately depict the tarantula in your drawing.
Understanding the Tarantula’s Anatomy

To draw a realistic tarantula, you need to understand its anatomy. Tarantulas, like all arachnids, have two main body segments: the cephalothorax and the abdomen. The cephalothorax houses the head, eyes, mouthparts, and legs. The abdomen is where the digestive and reproductive organs are located. The legs are jointed, and they are covered in sensory hairs. Familiarize yourself with the different parts of the tarantula’s body. Pay attention to how the legs are positioned and how they attach to the cephalothorax. Understanding these key anatomical features will help you draw a more accurate and dynamic representation of the tarantula.
Breaking Down the Body into Simple Forms
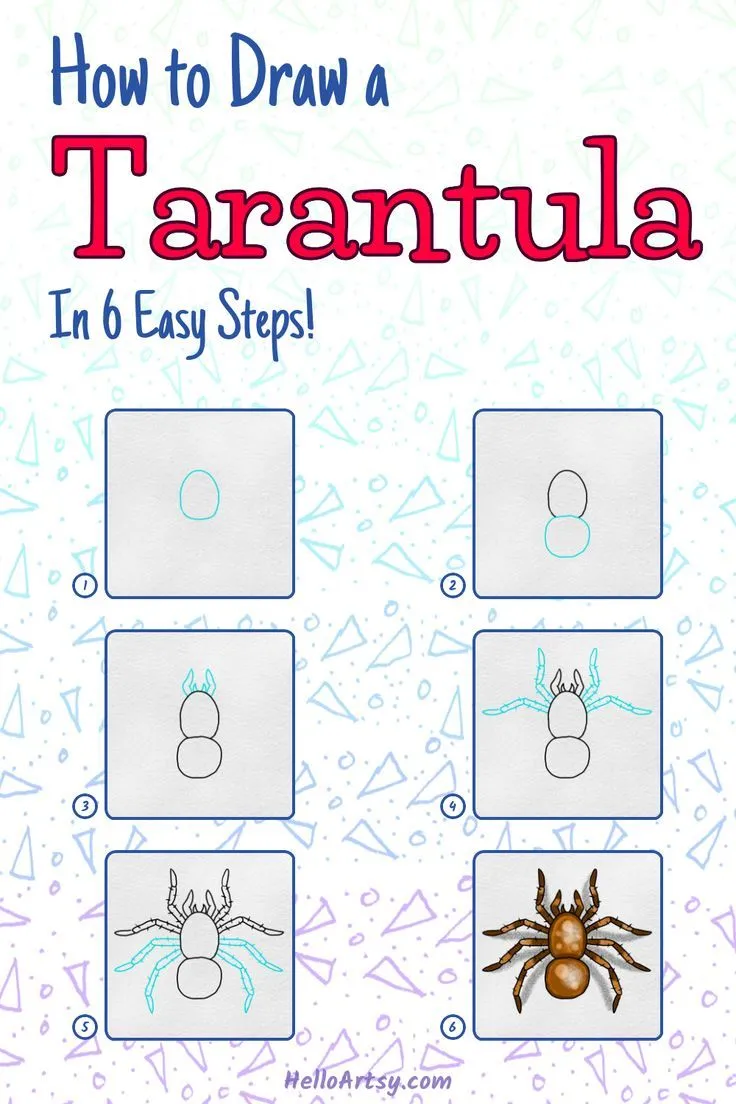
Simplify the tarantula’s complex form into basic shapes. Start with the cephalothorax, which can be represented as a rounded shape. Next, draw the abdomen as an oval or egg-like shape connected to the cephalothorax. Draw the legs as simple lines or elongated ovals. This simplification makes it easier to grasp the overall structure and proportions of the tarantula. Use light, loose pencil strokes to sketch these basic shapes. This will allow you to easily make adjustments as you refine your drawing. This process helps you to get the overall structure of the tarantula right before adding any details.
Step-by-Step Guide to Drawing the Tarantula
Now, let’s move into the step-by-step guide to drawing a tarantula. Follow these steps in order, starting with light sketches and gradually adding details. Start by lightly sketching the basic shapes of the body, then add the legs and other details. Be patient and take your time. It’s okay if your first attempt isn’t perfect. Drawing takes practice, and each drawing is a learning opportunity. Keep practicing and experimenting, and you will improve with each drawing. Don’t be afraid to erase and redraw until you are happy with your drawing.
Sketching the Body

Begin by lightly sketching the cephalothorax and the abdomen. Use a pencil to outline these shapes, keeping the lines loose and faint. Remember that the cephalothorax is slightly rounded, while the abdomen is typically more elongated. Pay attention to the proportions between the two parts of the body. Use your pencil to make light marks to represent the overall shape. Refine the shapes as you go, erasing and adjusting as needed. Accurate body proportion is critical in your drawing; a well-proportioned tarantula will look much more realistic than one with incorrect proportions.
Creating the Head and Carapace
Focus on the cephalothorax and refine its shape. Pay attention to the contours and any slight bulges or indentations. This is where you will place the eyes and mouthparts. Draw a slightly raised area on the cephalothorax where the eyes will be. The carapace is the hard shell covering the cephalothorax. It’s crucial to capture the correct shape and any distinctive features. Sketching the carapace accurately will give the drawing a sense of realism and will provide a solid foundation for the rest of the details.
Adding the Abdomen Details
Once you have the main body shapes in place, you can begin adding details to the abdomen. Tarantula abdomens often have distinct patterns, hairs, and textures. Lightly sketch these details, paying attention to the direction and density of the hairs. The patterns on the abdomen can be simple or complex, depending on the species you are drawing. Some tarantulas have stripes, spots, or other unique markings. You can use a slightly darker pencil to add texture and depth to the abdomen. Details make your drawings look more realistic and give them a sense of life.
Drawing the Legs

Now it’s time to draw the legs, which are critical for the tarantula’s distinctive appearance. Start by lightly sketching the position and direction of each leg. Remember that tarantulas have eight legs, which are attached to the cephalothorax. The legs have multiple segments, and they are usually covered in hairs. The legs provide the foundation for the rest of the drawing and help to give it a sense of movement and realism. Start with simple lines to indicate the general direction and position of the legs. This will help you to ensure that they are properly positioned and proportioned before you begin adding details.
Positioning the Legs
Pay close attention to the way the legs are positioned in relation to the body. Tarantulas can have different leg positions depending on their stance. Some may be stretched out, others may be tucked in. Consider the posture you want to depict and position the legs accordingly. The legs should extend from the cephalothorax in a way that looks natural and balanced. The placement and angle of the legs greatly impact the overall composition and feel of your drawing. Sketch the basic shapes of the legs, keeping them simple at first. Don’t worry about adding the details at this stage; focus on getting the position and proportions right.
Adding Details to the Legs
Once you have the legs in place, start adding details to the legs. Tarantula legs are segmented, with each segment having a specific shape. Sketch the joints and any curves or bends in the legs. Add the hairs that cover the legs. This will require patience and attention to detail. Use a slightly darker pencil to create these details and add texture. The small details will bring the drawing to life. Take your time, and don’t rush the process. It may take a while to perfect, but it is worth the effort to create a realistic drawing.
Adding the Pedipalps

The pedipalps are small appendages located near the mouth. They function similarly to the legs and are often used for grasping and sensing. The pedipalps are typically smaller than the legs and have their own distinct shape and structure. Add the pedipalps to your drawing, paying attention to their size and placement. The pedipalps should extend from the cephalothorax and should appear proportionally correct relative to the other parts of the body. It may take a few tries to correctly depict the pedipalps, but it is part of the overall drawing process. These details add to the drawing’s accuracy and realism.
Creating the Eyes and Fangs
The eyes and fangs are important details. Most tarantulas have eight eyes. They are small and positioned on the front of the cephalothorax. The fangs are located near the mouth. Draw the eyes as small, dark circles or ovals. Sketch the fangs, paying attention to their shape and how they curve. These small details help to give the tarantula a distinct look and personality. The eyes and fangs should be drawn in proportion to the rest of the body. You can use darker pencil shades to make them stand out more. You can experiment with different positions and sizes.
Adding Texture and Shading
Adding texture and shading will make your drawing more realistic and give it depth. Shading creates the illusion of three dimensions. Texture makes the drawing look more tactile. You can use a variety of techniques to add texture and shading to your drawing, including hatching, cross-hatching, and blending. The key is to take your time and to build up the shading gradually. It might take practice and patience to master these techniques, but the results will be worth the effort.
Understanding Shading Techniques

Hatching involves drawing parallel lines to create a shadow effect. The closer the lines, the darker the shadow. Cross-hatching involves drawing lines that cross each other to create darker areas. You can control the intensity of the shading by varying the density and angle of the lines. Blending involves softening the pencil strokes to create smooth transitions between light and dark areas. Use your finger or a blending stump to blend the graphite. Understanding these shading techniques is essential for creating realistic drawings. Practice each technique separately to see which works best for you and your style. Experimenting is key.
Adding Shadows for Depth
Use shading to create shadows and add depth to your drawing. Identify the light source and determine where the shadows should fall. Use hatching, cross-hatching, or blending to create these shadows. Start with light shading and gradually build up the darkness. Pay attention to the areas where the body curves or overlaps. These are the areas where shadows will be most prominent. Adding shadows is a fundamental step in creating a realistic drawing. It helps to bring the tarantula to life.
Adding Texture with Lines
Use lines to create texture on the body and legs of the tarantula. Use short, curved lines to depict the hairs on the legs and body. Use a combination of hatching and cross-hatching to create the texture of the carapace and abdomen. Vary the direction and density of the lines to simulate the different textures on the tarantula. Adding texture to your drawing will make it look more realistic and appealing. Different techniques will work in various areas, so feel free to experiment with different techniques. The texture adds to the visual interest and helps make the tarantula look more lifelike.
Finalizing Your Tarantula Drawing
Once you have added the shading and texture, you can move to the final touches of your drawing. These are the details that will bring your artwork to life and make it stand out. This stage involves refining the details, adding a background, and making any final adjustments. Take your time and be patient. These final touches will improve the quality of your work and make your tarantula drawing look amazing.
Refining the Details
Go over your drawing and refine the details. Make sure all lines are clean and defined. Erase any unnecessary lines. Add any remaining details, such as the hairs on the legs or the patterns on the abdomen. Check for any areas that need more shading or texture. Use a sharp pencil to create fine details. Use a blending stump to smooth the shading. Take a step back and look at your drawing from a distance to make sure everything looks balanced and proportionate. You can use various techniques to add details, such as erasing highlights and darkening shadows.
Adding a Background
Adding a background can help to make your tarantula drawing stand out. The background can give your drawing context. You can add a simple background, such as a few lines to represent the ground. You can also add a more complex background, such as the tarantula’s habitat. Experiment with different background ideas until you find one that complements your drawing. A simple background can focus the viewer’s attention on the tarantula. A more detailed background can add interest and context. Consider what the background should look like and how it fits the tarantula’s habitat.
Tips for Improving Your Drawings
Drawing is a skill that improves with practice and patience. The more you draw, the better you will become. Here are some tips to help you improve your skills. Keep practicing and experimenting with different techniques. Do not be afraid to step out of your comfort zone. The most important thing is to enjoy the process. As you continue to practice, you’ll see significant improvements in your abilities. Experiment with different styles, techniques, and subjects. Drawing should be fun and a way to express your creativity.
Practice Regularly
The most important tip is to practice regularly. The more you practice, the better you will become. Set aside time each day or week to draw. Even a few minutes of drawing each day can make a big difference. Focus on different techniques and subjects to keep your skills sharp. Start with simple exercises, such as drawing basic shapes and lines. Gradually increase the complexity of your drawings as your skills improve. Remember, consistency is key. The more you practice, the more comfortable you will become with the tools and techniques. Make it a habit. You can make drawing a part of your daily or weekly routine.
Studying Real Tarantulas
Studying real tarantulas is one of the best ways to improve your drawing skills. Observe their anatomy and the way they move. Look at photographs or videos of tarantulas. You can study live tarantulas if you have access to them. Pay attention to the details and the shapes. Observing live animals is always a great inspiration. This will help you understand their form and structure. The more you study real tarantulas, the more accurately you can draw them. Try to capture as many details as possible. You can also look at drawings and paintings of tarantulas by other artists to get inspiration. Learning from others can inspire you to try new techniques and styles.