What is a Dual Z-Axis Upgrade for Tevo Tarantula Pro?
The Tevo Tarantula Pro is a popular and affordable 3D printer, well-regarded by hobbyists for its open-source nature and upgradeability. One of the most beneficial upgrades you can perform is a dual Z-axis upgrade. In essence, a dual Z-axis upgrade replaces the single Z-axis motor that controls the vertical movement of the print bed or the print head (depending on the printer’s design) with two motors, one on each side. This offers significant advantages in terms of print quality, stability, and overall performance, making it a worthy investment for serious 3D printing enthusiasts. This guide will walk you through everything you need to know to successfully upgrade your Tevo Tarantula Pro with a dual Z-axis system.
Benefits of Upgrading to Dual Z-Axis
Upgrading your Tevo Tarantula Pro with a dual Z-axis kit offers several compelling advantages. By distributing the load and controlling the Z-axis movement from two points, the printer’s overall performance is dramatically enhanced. This translates directly into better prints, greater reliability, and a more enjoyable 3D printing experience. Let’s explore the key benefits in detail, to demonstrate why a dual Z-axis upgrade is a worthwhile modification for any Tevo Tarantula Pro owner looking to improve their prints.
Improved Print Quality

One of the most noticeable improvements after a dual Z-axis upgrade is the enhanced print quality. The dual-motor system ensures that the X-axis gantry (the part holding the print head) remains perfectly level during printing. This precise leveling minimizes layer shifting and other imperfections that can plague single Z-axis systems. Prints will have cleaner lines, sharper details, and a more professional finish. Reduced vibrations and a more stable platform contribute to the creation of high-quality prints, allowing you to realize complex and intricate designs with greater precision. The result is aesthetically pleasing and dimensionally accurate models.
Enhanced Stability and Reduced Wobble
The dual Z-axis system significantly enhances the structural stability of your Tevo Tarantula Pro. The two motors working in tandem provide a more robust and balanced support structure for the X-axis gantry. This increased stability minimizes the wobbling effect often seen with single Z-axis setups, especially at higher print speeds or when printing tall objects. Less wobble translates to more consistent layer adhesion and reduced chances of print failures. This stability is essential for achieving consistent and reliable printing, leading to greater satisfaction with your 3D printing endeavors.
Increased Printing Speed Potential
While not a direct result, a dual Z-axis upgrade often allows for increased printing speeds. The enhanced stability and reduced vibrations mean you can print at faster rates without sacrificing quality. The dual Z-axis system allows for a more controlled and responsive Z-axis movement, enabling smoother and more precise layer deposition, even at higher speeds. However, it’s important to note that other factors, such as the printer’s hotend and overall build quality, also affect maximum print speed. By upgrading to a dual Z-axis system, you’re creating a platform to eventually push your print speeds higher and ultimately print parts quicker.
Compatibility and Requirements for the Upgrade

Before embarking on the dual Z-axis upgrade, it’s crucial to ensure compatibility and gather the necessary components. Generally, dual Z-axis upgrade kits are designed specifically for the Tevo Tarantula Pro, but it’s always wise to double-check the kit’s specifications to guarantee a perfect fit. There is a wide variety of dual Z-axis upgrade kits available, some of which may require specific firmware configurations. Make sure your existing firmware is compatible or prepare for a potential firmware update. Thoroughly review the included instructions with the kit, and identify any additional tools or hardware that may be needed for installation.
Gathering Necessary Components
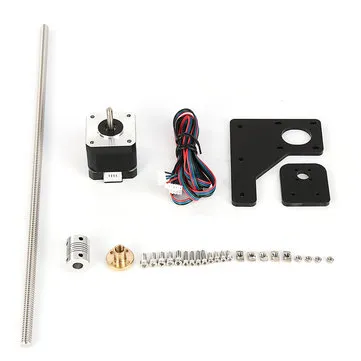
The essential components for a dual Z-axis upgrade are usually included in the kit. However, it’s wise to inspect everything before you start to install your upgrade. The standard components typically include two stepper motors, two lead screws (Z-axis rods), motor mounts, and a connecting belt or rod to ensure synchronization. Some kits may also include a dual Z-axis motor driver, although the Tevo Tarantula Pro’s existing control board might be sufficient. Verify that all parts are present and in good condition before proceeding. Extra screws, wires, or connectors might be needed, so it is a good idea to have a basic electronics kit on hand just in case. Also, a set of Allen wrenches and screwdrivers are required.
Tools You Will Need
Besides the upgrade kit itself, you’ll require several tools to complete the installation. These tools will help facilitate the process, from removing existing parts to installing new components. A set of Allen wrenches is essential, as many 3D printers use metric screws. A screwdriver set, especially with different sizes, is also necessary for various screws. Pliers, wire strippers, and crimpers may be needed if you need to adjust or connect any wiring. A digital caliper can be extremely useful for precise measurements, such as ensuring that the lead screws are correctly aligned. Finally, a level and a ruler or measuring tape will aid in ensuring the printer is level and that all components are properly aligned. Having these tools at your disposal will make the upgrade process much smoother.
The Dual Z-Axis Upgrade Kit

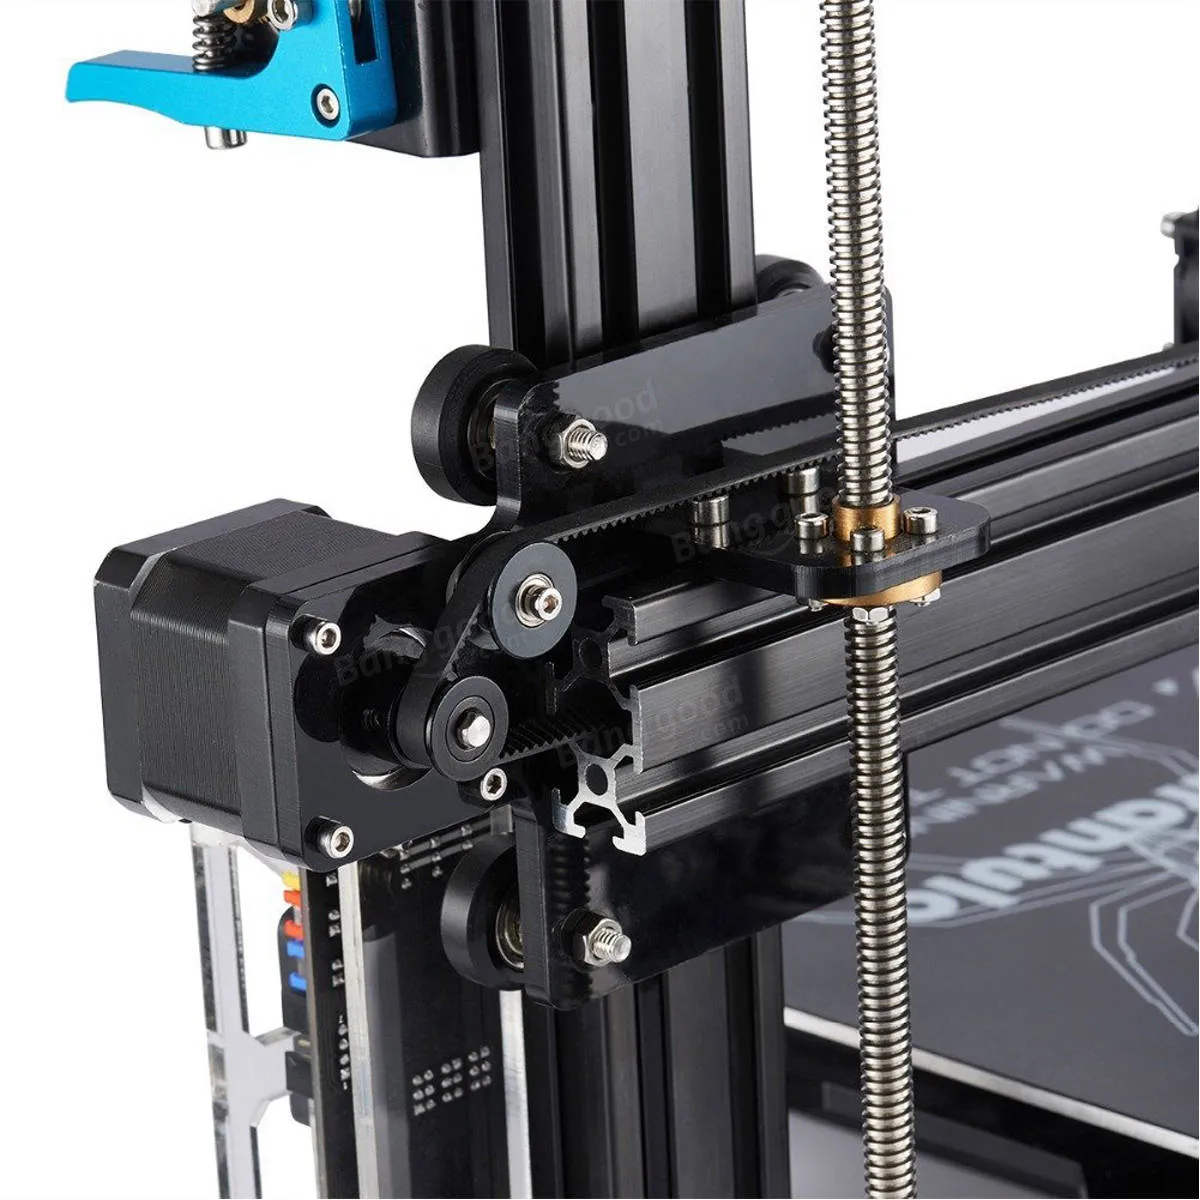
A typical dual Z-axis upgrade kit for the Tevo Tarantula Pro consists of several key components designed to enhance the printer’s Z-axis stability and precision. The heart of the kit includes two NEMA 17 stepper motors, which are responsible for driving the Z-axis lead screws. Two lead screws, usually threaded rods, are included to allow independent control and movement of the Z-axis. Motor mounts are provided to securely attach the motors to the printer’s frame, maintaining alignment. Some kits incorporate a belt and pulley system, to ensure synchronous movement of the Z-axis, or a connecting rod. The kit may also include mounting hardware (screws, nuts, and washers), wiring, and sometimes an additional stepper motor driver. Kits range in price, but generally, a good kit will have everything necessary to provide a quality upgrade.
Step-by-Step Installation Guide
Installing the dual Z-axis upgrade on your Tevo Tarantula Pro can be broken down into several manageable steps. Following a methodical approach will help ensure a successful upgrade. Read through all the steps before you start, and make sure you have all the required tools and components. Before you begin, unplug your printer to avoid any electrical hazards. Start by disassembling the existing Z-axis components, then carefully install the new dual Z-axis parts. Make sure all connections are secure and follow the kit’s instructions diligently. Take your time, and don’t hesitate to pause and double-check each step. Here’s a detailed step-by-step guide, covering the main aspects of installing the upgrade.
Preparing the Tevo Tarantula Pro for the Upgrade
Before you begin installing the new components, it’s necessary to prepare your Tevo Tarantula Pro. This includes removing the existing Z-axis motor, lead screw, and associated hardware. Start by disconnecting the printer from the power source. Carefully remove the bed from the printer and set it aside. Locate and remove the existing Z-axis motor. The motor is usually mounted on the frame. Once the motor is removed, detach the lead screw from the Z-axis motor and the top support. Save all the screws and hardware, as you may need them later in the installation. The disassembly phase sets the foundation for the dual Z-axis upgrade. Ensure all the existing components are carefully removed to avoid any complications. The more organized you are now, the easier it will be later. Finally, prepare your work area and organize components so the installation goes smoothly.
Installing the Dual Z-Axis Motors and Components

With the old Z-axis components removed, you can start installing the dual Z-axis motors and components. Typically, you’ll install the new stepper motors on either side of the printer frame, using the motor mounts provided in the kit. Make sure that the motor mounts are securely fastened to the frame. Insert the lead screws into the motor couplers and feed them up through the frame supports. Verify that the lead screws are aligned correctly, and make sure they move smoothly. Then, attach the X-axis gantry to the lead screws. The gantry should move up and down freely. Depending on the kit, you may also need to install a connecting rod or belt and pulley system to ensure the motors operate in sync. Ensure each component is correctly aligned before tightening any screws completely. This will prevent binding and ensure smooth Z-axis movement.
Wiring and Connecting the Motors
After installing the mechanical components, you’ll need to wire the new Z-axis motors to the printer’s control board. Refer to the instructions provided with your upgrade kit, as wiring configurations can vary. Usually, the dual Z-axis motors connect to the Z-axis motor driver on the control board. If your kit includes a separate motor driver, you’ll need to install it on the control board and connect the motors accordingly. It’s essential to double-check the wiring to avoid any electrical issues. Make sure you connect the motor wires to the correct terminals on the control board or the motor driver. After you wire the motors, carefully route the wires to avoid any interference with moving parts. Securing the wires can be done by using zip ties or cable clips to provide clean, organized cable management. This ensures that the wiring does not interfere with any moving parts and promotes the reliability of the upgrade.
Configuring Firmware and Adjustments
Once the hardware is in place and the wiring is connected, you’ll need to configure your printer’s firmware. This step is crucial for ensuring that the dual Z-axis motors operate correctly. You may need to update the firmware or change the settings to accommodate the new motors. You will need to go into your firmware settings and make sure that the current is properly set. This is especially important for safety and performance. There are many different firmware programs to choose from, such as Marlin. Connect your 3D printer to your computer and use the appropriate software to update the firmware, such as the Arduino IDE. Adjust the Z-axis steps per millimeter setting to match the lead screw pitch. This setting is usually found in the firmware configuration file, and it determines how much the Z-axis moves for each step of the motor. Once you’ve configured the firmware, test the Z-axis movement to ensure everything is working as intended. The bed should move smoothly and evenly. If the Z-axis does not move in a synchronized way, double-check the wiring and the firmware configuration.
Leveling the Bed and Calibrating Z-Axis
After the firmware is configured and the motors are moving, the next steps include leveling the print bed and calibrating the Z-axis. Bed leveling is critical for getting good prints, and it’s even more crucial after a dual Z-axis upgrade. Ensure that the X-axis gantry is level. You can achieve this by using a level. Then, use the leveling screws on your print bed to level the bed itself. You should use the paper method to ensure the nozzle is the proper distance from the bed. If the bed is not level, your prints will not adhere well to the bed. Once you have leveled the bed, calibrate the Z-axis. This involves setting the Z-offset to the correct position, so the nozzle doesn’t scratch the bed or print in mid-air. The Z-offset setting is usually adjusted in the printer’s control panel. Fine-tune this setting until the first layer adheres well to the bed. Proper leveling and calibration are essential for achieving high-quality prints and ensuring your 3D printer is working at its best.
Troubleshooting Common Issues
During the installation or after the upgrade, you may encounter a few common issues. Knowing these potential problems can help you quickly diagnose and resolve any difficulties. The most common ones include uneven bed leveling, motor synchronization problems, and software configuration issues. Here are some of the most common problems, along with the steps you can take to resolve them.
Uneven Bed Leveling
Uneven bed leveling is a frequent problem after a dual Z-axis upgrade. You might observe that the bed is higher on one side than the other. It could be caused by misaligned lead screws, loose motor mounts, or an improperly leveled gantry. First, check if the lead screws are perfectly vertical and parallel. Then, make sure that the motor mounts are securely fastened. If the X-axis gantry is not perfectly level, carefully adjust its position. Use a level to ensure that the X-axis gantry is parallel to the bed. Make fine adjustments using the leveling screws until the bed is perfectly level across its entire surface.
Motor Synchronization Problems

Another common issue is motor synchronization problems, where the two Z-axis motors do not move in perfect synchronization. This can cause the X-axis gantry to tilt or bind during movement, which can result in print defects. A common cause of synchronization problems is wiring issues. Double-check the wiring connections to make sure the motors are wired correctly. Also, ensure that your firmware is configured to drive both motors. Loose belts or pulleys on the connecting mechanism (if your kit has one) can cause synchronization issues. If your kit has a connecting rod or belt and pulley system, make sure that the belt is tight and the pulleys are properly aligned. Sometimes, a motor might be faulty. If a motor is not working correctly, it will cause synchronization problems. Replacing the faulty motor should fix the problem.
Software Configuration Problems
Software configuration problems can prevent the upgrade from working correctly. These problems often manifest as incorrect Z-axis movement or other print-related problems. Incorrect firmware settings are often the cause. Double-check the firmware settings. Make sure that the Z-axis steps per millimeter setting is correct and that the motor driver current is properly configured. Another source of configuration problems is a mismatch between the settings in your slicer software and your printer’s firmware. Ensure your slicer settings, such as the Z-axis movement speed, are compatible with your printer’s capabilities. Review all of your settings and carefully adjust them until the printer performs as intended. If needed, consult online resources or forums for troubleshooting guidance.
Maintenance and Further Enhancements
Once the dual Z-axis upgrade is complete, some regular maintenance is required to keep the printer running smoothly. Also, consider further enhancements to maximize the benefits of the upgrade. Maintaining the printer will prevent any issues from developing. Further enhancements will take the printer to the next level. Both are crucial for the 3D printer.
Regular Maintenance Tips
Regular maintenance is essential to ensure the smooth and reliable operation of your Tevo Tarantula Pro, especially after a dual Z-axis upgrade. Periodically check the lead screws and the motor couplings to make sure they are clean and free of any debris. Lubricate the lead screws with a light grease to reduce friction and ensure smooth Z-axis movement. Inspect the motor mounts and all screws regularly. Tighten any loose screws to maintain stability. Periodically re-level the bed to ensure that it remains flat and level. Following these tips will help extend the life of your printer and help to avoid any problems.
Tips for Improving Print Quality After Upgrade
The dual Z-axis upgrade significantly improves print quality, and there are other steps you can take to further enhance the quality of your prints. Optimize your slicer settings to match the performance of your printer. Experiment with different layer heights, print speeds, and temperatures to find the best settings. Consider adding a bed surface to your print bed. Surfaces such as PEI sheets or glass beds can improve bed adhesion. Consider replacing your hotend with a high-quality all-metal hotend to enhance printing performance. By taking these steps, you can get the most from the dual Z-axis upgrade and achieve great prints.
Conclusion
Performing a dual Z-axis upgrade on your Tevo Tarantula Pro is a worthwhile investment for anyone seeking to improve print quality, stability, and overall performance. By following the steps in this guide, you can successfully install the upgrade and enjoy the benefits of a more reliable and efficient 3D printer. The result is a smoother, more stable printing experience that allows for more precise prints. With regular maintenance and a few additional enhancements, you can make your Tevo Tarantula Pro a workhorse for all your 3D printing projects. This upgrade is one of the best ways to enhance the performance and improve the quality of your printed models.